
How to add a timestamp to photos on iPhone
The iPhone camera has never had a setting that prints the date onto a photo. It records the capture time, the GPS coordinates, and the camera settings into the file's metadata, where you cannot see them and where most apps quietly discard them. If you need the date visible in the picture — for a job record, an insurance claim, or a dispute six months from now — you have to put it there yourself.
· 6 min read

Why the iPhone has no built-in date stamp
Every photo your iPhone takes already carries its capture date. It lives in the EXIF block inside the file, alongside the GPS coordinates, the lens used, and the exposure settings. Open any photo in the Photos app, swipe up, and you will see it.
The catch is that EXIF is metadata, not pixels. It is attached to the file rather than drawn into the image, so it survives only as long as the file does. Send that photo through most messaging apps, upload it to a social platform, paste it into a document, or take a screenshot of it, and the metadata is stripped on the way out. The picture arrives looking identical and carrying no date at all.
That is a deliberate privacy decision by Apple and the platforms, and it is the right default for personal photos. It is the wrong default when the date is the entire point of the photo.
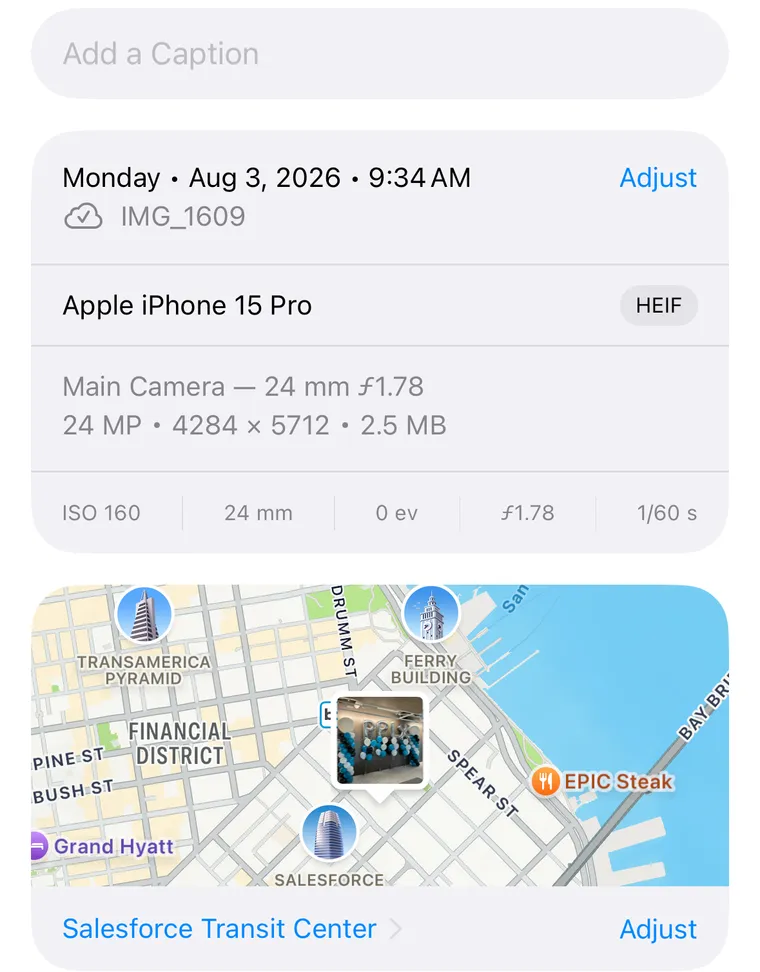
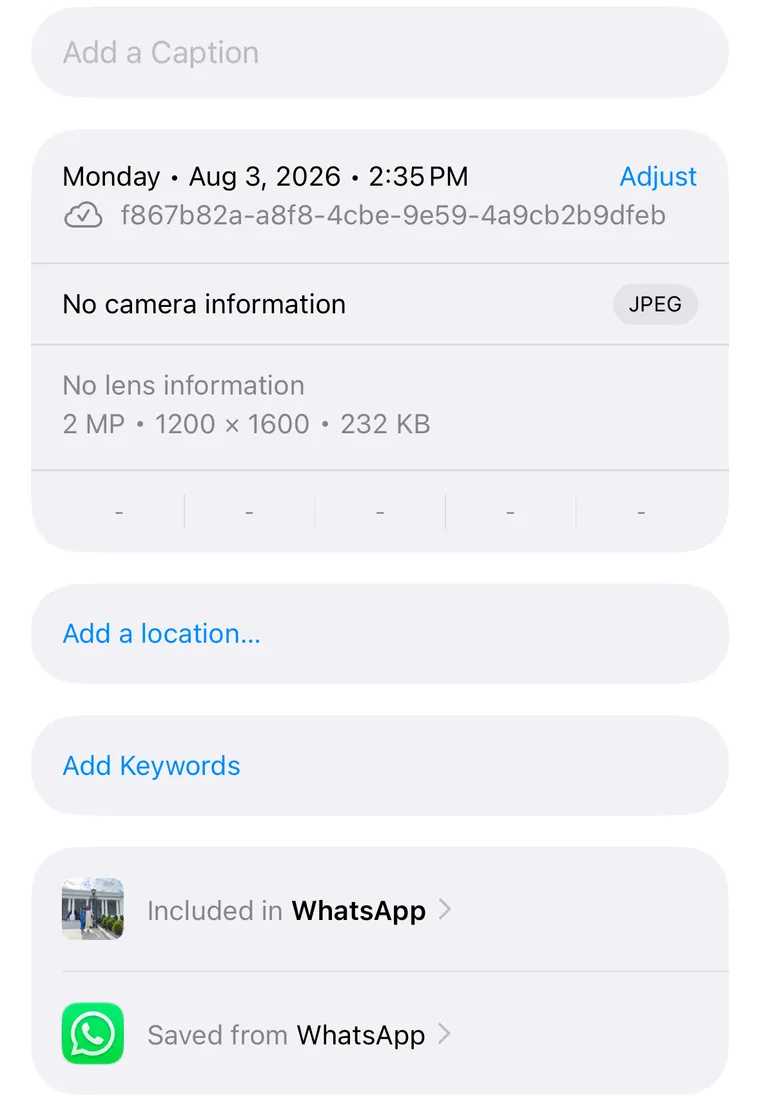
The pair below is one photo. On the left, straight from the camera: the capture time, the iPhone model, the lens, the exposure, and a map of where it was taken. On the right, the same picture after a round trip through WhatsApp — the timestamp is now when it was saved rather than when it was shot, the camera and lens read "No information", the exposure row is empty, and the map is gone. It also came back as a 2 MP JPEG in place of a 24 MP original, which is a separate problem for anyone who might need to zoom in later.
Option 1: stamp it at the moment of capture
The most reliable approach is to take the photo with an app that draws the stamp into the image as it captures. The date, time, and location become part of the picture, so nothing downstream can remove them.
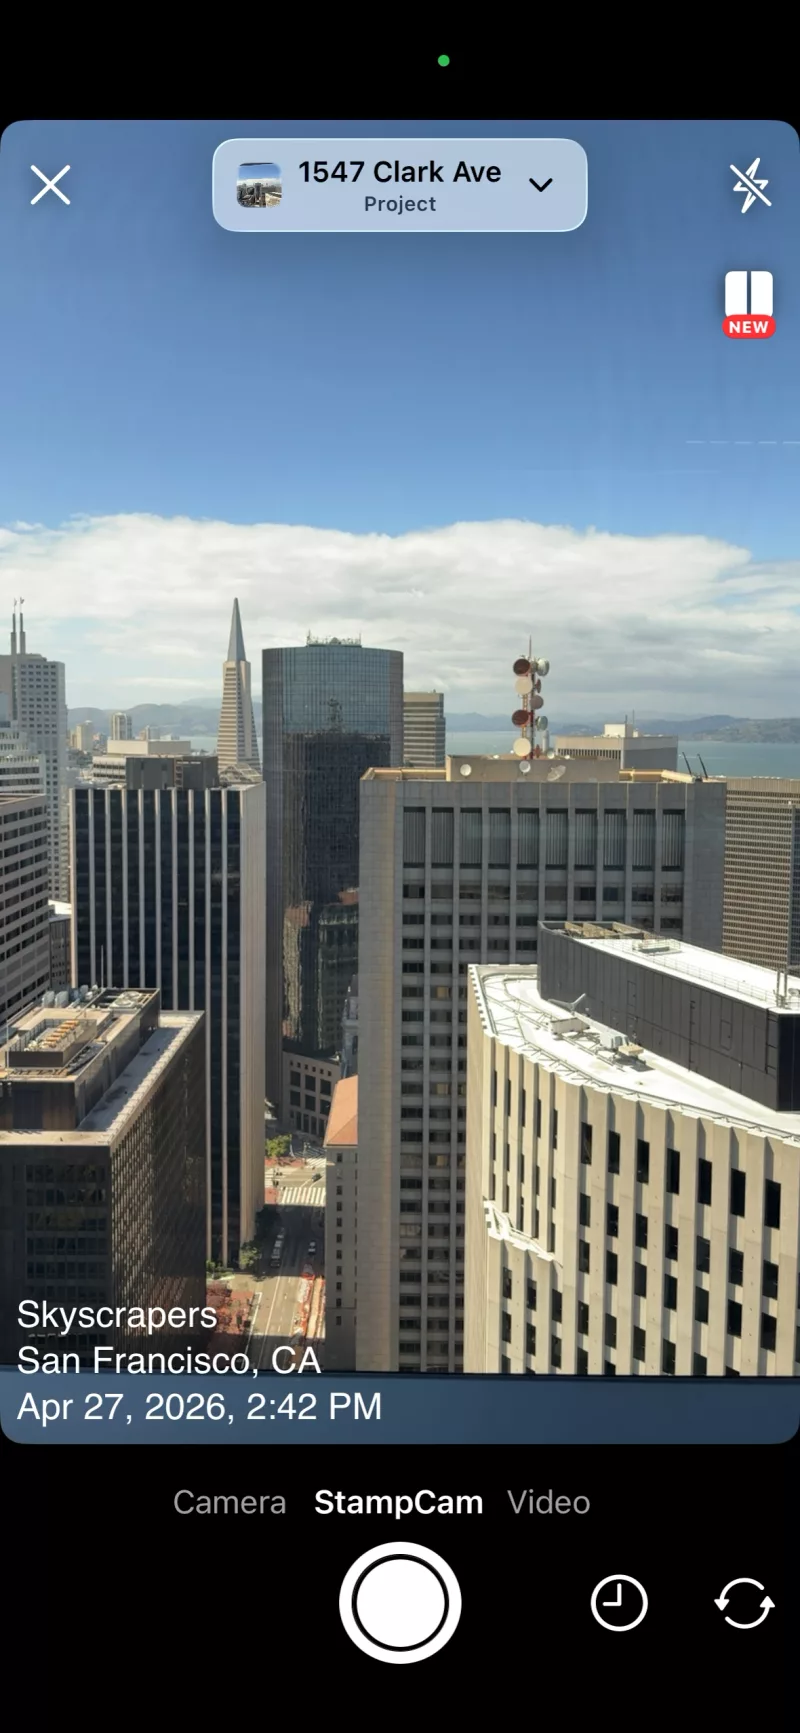
In Timestamp It this is the StampCam mode. The stamp is rendered live in the viewfinder, so you can see exactly what the finished photo will look like before you press the shutter, and the project picker at the top files the photo under the right job automatically.
- 1Open Timestamp It and switch to the StampCam tab.
- 2Tap the project name at the top to file this session under the right job. Every photo you take until you change it lands there.
- 3Check the stamp preview in the corner of the frame — that is exactly what will be burned into the photo.
- 4Take the photo. The date, time, and location are already in the pixels.
Choosing what the stamp actually says
A stamp is only useful if it carries the information the reader needs. A date alone answers when; a date with an address answers when and where, which is what most disputes actually turn on.
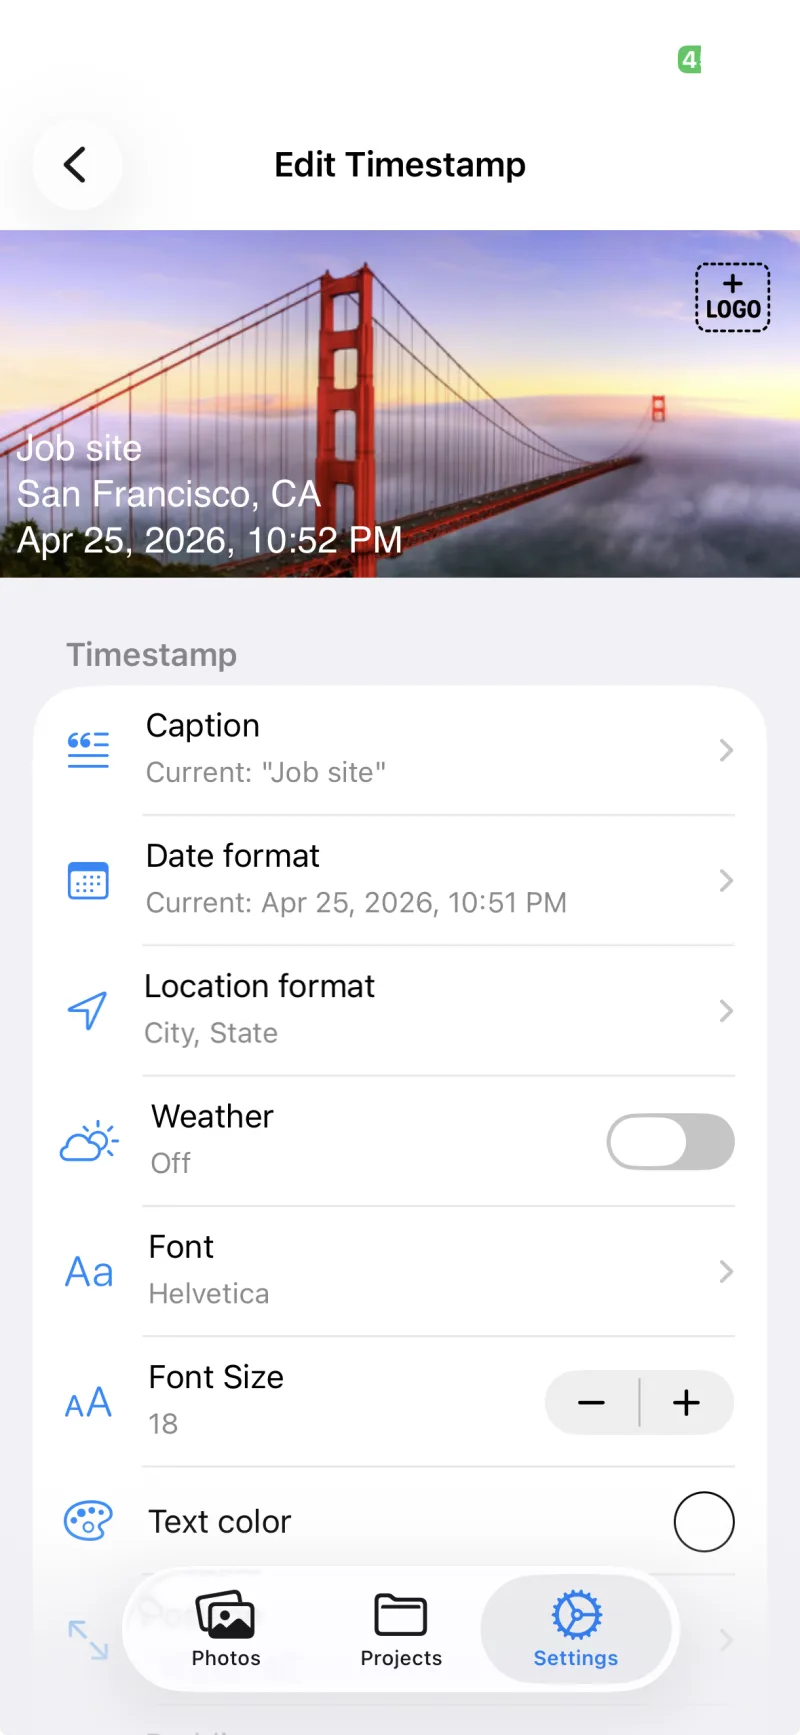
Timestamp It lets you set the caption, the date format, and how the location is written — full coordinates for evidence work, or city and state when a street address would be too much. You can also set the font, size, and color so the stamp stays legible against whatever you are photographing, and add a company logo if the photo is going to a client.
There is also a weather toggle, off by default. Turned on, the conditions at the moment of capture are pulled from your location and burned in alongside the time. It is niche until the day it is not: rain on the afternoon a pour was called off, or the temperature when a material failed, is the sort of detail nobody writes down and everybody later wishes they had.
Option 2: stamp a photo you have already taken
If the photo already exists, you can still add a visible stamp — but be clear about what it proves. Stamping after the fact draws the date onto the image from the file's existing EXIF, so it is only as trustworthy as that metadata. If the photo has been through a messaging app and lost its EXIF, there may be no reliable capture date left to read.
That still has real uses. Importing a batch from the camera roll at the end of a job and stamping it is far better than no record at all, and the original EXIF is preserved underneath the stamp. Just do not treat a stamp applied later as equivalent to one applied at capture.
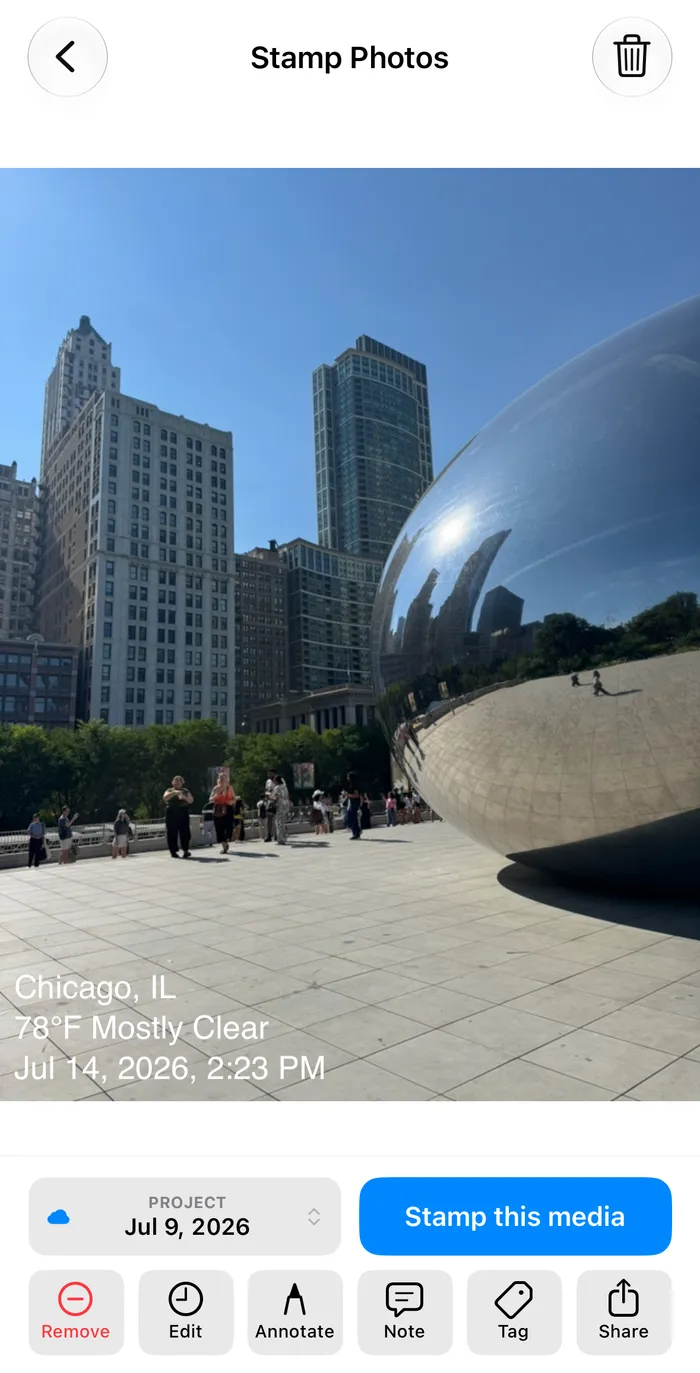
You can see the distinction in the screen below. The photo was taken in July and is being stamped in August, and the stamp reads the July date — because it is drawn from the file, not from the clock. That is the behavior you want, and it is also exactly why the stamp is only as good as the metadata underneath it.
Which one should you use
If the photo might ever need to settle a question, stamp at capture. It is the only option where the date cannot be separated from the image, and it costs nothing extra once the app is set up.
If you are cataloguing photos that already exist, stamp them afterwards and keep the originals. Both approaches are worth having, but they are not equivalent, and the difference only matters on the day someone asks when a photo was taken.
Frequently asked
Put the date where it cannot be stripped
Stamp the date, time, and location into the photo as you take it. Free on iPhone and Android, with unlimited photos and projects.